Rescuing Important Emails from the Junk Folder with Microsoft Graph API

Introduction: Because, Of Course, It Had to Be the CEO
Let me paint you a picture: we were managing the Microsoft 365 environment for one of our long-time customers, let’s call them Company A. We had everything running smoothly—mailboxes organized, Teams working like a charm, and security policies in place. You know, the usual IT perfection (or at least close enough!). Then, out of nowhere, Company A gets bought by Company B—another company that was also using Microsoft 365 but on a completely different tenant. I mean, what’s better than managing one tenant? Managing two, of course! 🙄
The plan was simple: assess the current environment, plan the migration, and move over a few hundred—okay, maybe a few thousand—users from Tenant A to Tenant B. Easy, right? Well, it would have been if the CEO of Company B (now CEO of both companies) hadn’t decided to send a heartfelt, company-wide welcome email to all employees from Company A. You know, one of those, “Welcome to the family, let’s make magic happen together” emails.
Sounds nice, right? Except that for some reason, this email didn’t land in everyone’s inbox. Oh no, it decided to take a detour straight into the junk folder of several employees in Tenant A. And of course, it couldn’t be just anyone. Nope—it’s always the CEO, CFO, or some other high-level executive who faces this kind of issue. Why is it always the top brass? I’m convinced it’s the universe’s way of keeping us humble
So there we were, tasked with quietly and efficiently moving the CEO’s email out of the junk folder and into the inbox—without raising any eyebrows, of course. No one needs to know that the new CEO’s warm welcome was rejected by the company’s spam filter
That’s where the Microsoft Graph API comes in to save the day (and our sanity). In this blog, I’m going to walk you through how we used the Graph API to find those misplaced emails and move them to the inbox, all without anyone even noticing. You’ll get code samples, tips, and maybe a few laughs along the way—because, let’s be honest, if we can’t laugh at our IT woes, what else can we do?
Stick around, and I’ll show you how to become the email-moving ninja your CEO desperately needs. Ready? Let’s dive in!
What You’ll Need to Become an Email-Rescuing Ninja
Alright, let’s get into the nitty-gritty of how we’re going to rescue those poor, misplaced emails from the junk folder using the Microsoft Graph API. Before we start flipping bits and bytes, here’s what we’ll be doing (and don’t worry, I’ll walk you through it step by step—funny analogies included).
Step 1: Authenticating with the Graph API (Because We Need the Keys to the Castle Before We Can Move Anything Around)
Before we can start shuffling emails from the junk folder to the inbox, we need permission. Think of it like trying to get into a fancy club—you need to show your VIP pass at the door. In our case, that VIP pass is the OAuth2 access token, which lets us call the Microsoft Graph API to interact with users’ mailboxes.
In this step, we’ll be:
- Setting up app registration in Azure AD (because no API wants to talk to just anyone).
- Getting the appropriate permissions to read and write emails using the Mail. ReadWrite scope.
- Generating our access token, which is like getting the master key to every user’s mailbox. (Don’t worry, we’ll be responsible with this power. It’s not like we’re looking for juicy gossip or anything.)
Step 2: Searching for Those Sneaky Emails in the Junk Folder
Once we’ve got our access token (a.k.a. the keys to the castle), it’s time to go email hunting. The good news is, the Graph API is like a professional detective—it’ll help us track down those misplaced CEO emails that thought they could hide in the junk folder.
We’ll use the API to:
- Search through the JunkEmail folder for emails with specific subjects, senders, or time frames (in this case, our poor CEO’s welcome message).
- Get the email IDs of the junked messages so we know exactly which ones to move.
Think of it like finding that one sock that always goes missing after laundry day. You know it’s there somewhere, hiding in plain sight.
Step 3: Moving Emails to the Inbox—Where They Belong (Like Putting Socks in the SockDrawer After Laundry Day)
Now that we’ve found the elusive CEO email in the junk folder, it’s time to move it where it rightfully belongs—the inbox. This is the digital equivalent of putting socks back in the sock drawer after laundry day. It’s a simple act, but one that makes all the difference in avoiding chaos. 😅
In this step, we’ll:
- Use the Graph API’s move endpoint to relocate the emails from the junk folder to the inbox.
- Make sure everything is neatly organized in its proper place—no more important
emails getting flagged as junk
Step 4: Doing All This Without Tipping Off the Users (Stealth Mode: Activated!)
Finally, we’ve got to make sure all this happens without anyone noticing. No one needs to know that their brand-new CEO’s heartfelt welcome email was considered digital garbage by the spam filter. We’ll move the emails in stealth mode—silent, efficient, and completely under the radar
In this step, we’ll:
- Ensure the users aren’t alerted by unnecessary notifications.
- Keep everything quiet, like a ninja slipping into the shadows after a job well done.
Because the last thing you want is for someone to ask, “Hey, why did the CEO’s email land in junk?”
Step 1: Authenticating with the Graph API (Because No Ninja Gets into the Castle Without the Right Keys)
Alright, warriors, the first step of our mission is to secure access to the Graph API—this is your golden ticket to all the inbox-saving power. But, like any good ninja, we don’t just barge in through the front door. We need to sneak in the right way by grabbing an OAuth2 token that’ll let us call the Graph API like pros. Ready to get your key to the castle? Let’s break it down:
Step 1.1: Registering Your App in Azure AD (The Secret Entrance)
To get started, you need to register your app in Azure Active Directory. This is where we create a stealthy identity for our app, which we’ll use to request the magical token that gives us access.
- Head over to the Azure Portal and sign in.
- In the left-hand menu, click Azure Active Directory.
- Go to App Registrations and hit New Registration.
- Give your app a name (something cool like “NinjaEmailMover”).
- Under Supported account types, select Accounts in this organizational directory only (if you’re only working within your organization).
- For the Redirect URI, choose Public client/native and enter https://login.microsoftonline.com/common/oauth2/nativeclient.
- Click Register, and boom—you’ve just created the app that will let you perform your ninja magic
Step 1.2: Granting Permissions to the App (Power Up)
Now that we’ve registered the app, we need to give it the right
permissions
to read and move emails. Because without the right permissions, our ninja tools are pretty much useless.
- In your newly created app, go to API Permissions.
- Click Add a permission, then choose Microsoft Graph.
- Select Delegated Permissions and check the following:
-
- > Mail.ReadWrite (Allows your app to read and move emails)
- > User.Read (This one’s default, and it’s just to read basic user profile info)
-
- Once you’ve added the permissions, click Grant admin consent to give your app the green light to actually use them.
Now your app has the power it needs to read and move emails. Pretty cool, right? 🔥
Step 1.3: Creating a Client Secret (Your Ninja Tool)
Next up, we need to create a Client Secret. This is like your app’s katana—it’ll let you authenticate and request access tokens when you call the Graph API.
- Go to Certificates & Secrets in your app’s settings.
- Click New client secret.
- Give it a description (like “NinjaSecret”) and choose an expiration time.
- Click Add.
- Important: Copy the secret value and store it somewhere safe (not on a Post-it note!). You’ll need it to authenticate your app, and you won’t be able to see it again after you leave this page.
Step 1.4: Store That Token Securely (Guard It Like a True Ninja)
Your token is your pass to the API, and just like any secret tool in your ninja arsenal, you need to protect it. This token is typically valid for 60 minutes, so make sure you refresh
it before it expires.
What This Script Does?
What This Script Does?
- Authenticate: It first grabs an OAuth2 access token so we can communicate with the Microsoft Graph API.
- Search the Junk Folder: For each user, the script will search the Junk Email folder for emails matching a specific subject.
- Move Emails: If the email is found, it will be copied (moved) to the user’s inbox.
- Log Progress: We’ll get live feedback from the script on whether emails were found and moved successfully or not.
Step 1: Authentication (Because We Need Permission to Move Stuff)
Before we start rummaging through users’ junk folders, we need to authenticate with the Graph API. This is done using OAuth2, and the script will request an access token by passing in the ClientID, TenantID, and ClientSecret of our Azure AD app.
Here’s the function that handles this for us:
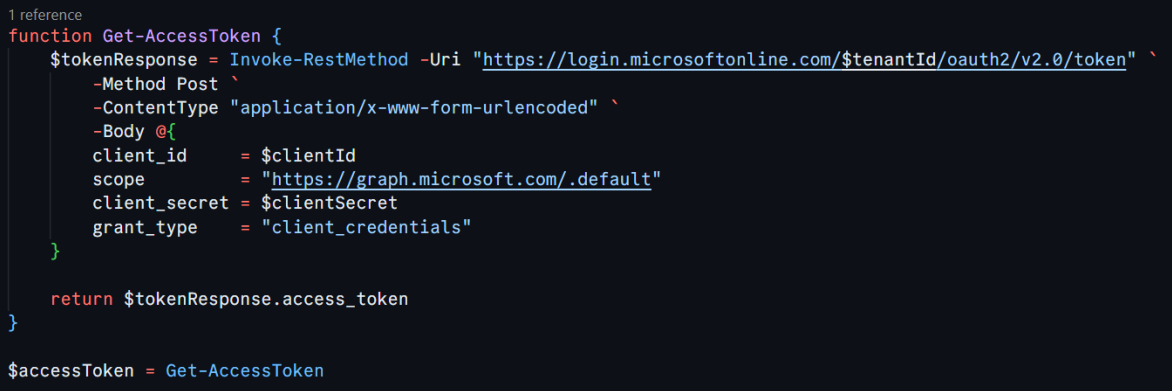
This function sends a request to Azure AD, asking for a token that gives us permission to access users’ mailboxes. You’ll need to replace , , and with your actual values from your Azure AD app registration. This token is our “all-access pass” to the Graph API. Fun fact: Getting this token feels like having the master key to the building…except this key only opens inboxes and junk folders. 🗝️
Step 2: Reading User Emails from a File (Bulk Operations for the Win)
To avoid manually specifying each user, this script reads a list of users from a text file. Each email in the file will be processed in turn. Here’s how we grab that list of users:

Each user’s email address should be listed on a new line in the text file. The script will iterate over this list and handle junk email detection for each user. It’s a nice bulk operation—no need to handle one user at a time.
Step 3: Searching for Emails in the Junk Folder (Ninja Radar On)
Now, for each user in our list, we’ll search their JunkEmail folder for any messages that match the specified subject. We’re using the Microsoft Graph API to do this

This part of the script constructs the Graph API URL that targets the JunkEmail folder for a particular user ($userEmail). The ?$filter=subject eq ‘$emailSubject’ part filters the emails to only those matching the subject you specify.
It’s like being a ninja detective, scanning for emails that don’t belong in the shadows of the junk folder. 🥷📧
Step 4: Moving the Email to the Inbox (Time to Strike)
Once we’ve located the email in the junk folder, we need to move it to the inbox where it belongs. Here’s how we do that:
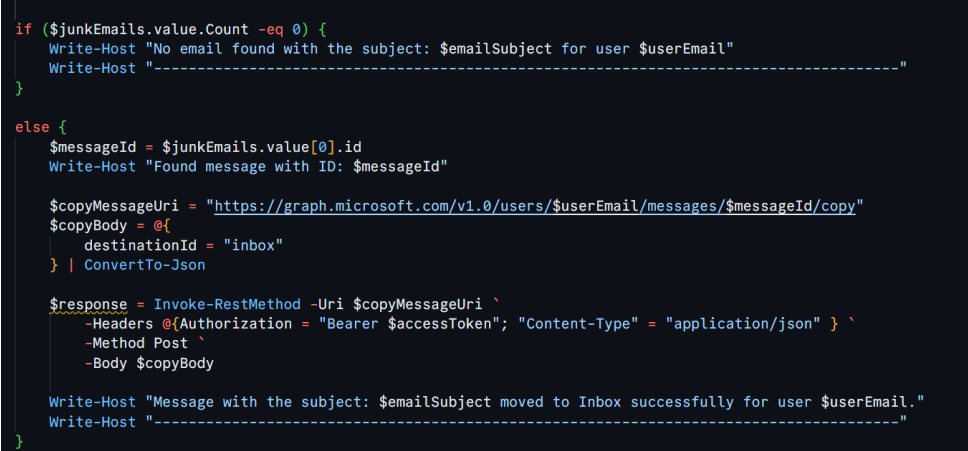
Here’s what happens in this block:
- First, we check if any matching emails were found in the junk folder ($junkEmails.value.Count -eq 0).
- If no email is found, the script logs a message and moves on to the next user.
- If an email is found, we extract the message ID and construct the API call to move (copy) it to the inbox.
- The destinationId = “inbox” specifies where the email will be moved.
Step 5: Logging the Results (Because Feedback is Key)
The script gives you live feedback about whether it found an email and successfully moved it. This way, you can monitor what’s happening and make sure the operation runs smoothly. You’ll know exactly what’s going on, and you can intervene if something looks off.
Wrapping It Up: Ninja Level 100 Achieved!
And there you have it! With just a few lines of PowerShell and the power of the Microsoft Graph API, you’ve become a master of email movement, whisking important messages out of the junk folder and into the inbox—all without breaking a sweat.
This script is especially handy if you’re managing multiple users and don’t want to dig through each junk folder manually. Now, you can let PowerShell and the Graph API do the heavy lifting while you take the credit for saving the day.
So next time a CEO’s email ends up in the junk folder, you’ll be ready. Just don’t forget to add this to your IT ninja toolbox! 🥷✨
Have any questions or issues? Drop them in the comments below, and let’s troubleshoot together!
Comments On "Rescuing Important Emails from the Junk Folder with Microsoft Graph API"
Leave a Reply
Recent Blogs

May
01
2025
From Data to Decisions: How Data Analytics is Transforming UK Enterprises
Introduction Imagine knowing what your customers want before they even realize it. What if you could anticipate market trends, optimize
Apr
29
2025
Effective Multi-Cloud Management: Security, Cost Optimization, and Strategy
Mastering Multi-Cloud Management in 2025: Centralization, Security, Cost, and Automation Introduction The multi-cloud management platform market reached $13.33 billion in
Apr
09
2025
Power BI in 2025: Latest Features, Trends & Best Practices
Introduction In the fast-changing business intelligence landscape, data is much more than simple digits—it lays the cornerstone for tactical choices.

Mar
21
2025
Azure Landing Zones: Build Secure, Scalable Cloud Foundations
Want to build a secure, scalable cloud setup? Discover how Azure Landing Zones create a strong foundation for your cloud

Mar
13
2025
Advance Analytics with Microsoft Fabric
Unlock the full potential of Microsoft Fabric and take your analytics game to the next level! In this exclusive webinar,
Feb
24
2025
How to Migrate VMware to Azure? Plan, Execute and Optimize Your Migration using Azure.
For several years, VMware solutions have been at the forefront of the business world, trusted as the virtualization platform powering
Feb
17
2025
Microsoft Fabric Architecture Guide 2025 – Key Insights & Features
Microsoft Fabric is an integrated analytics and data platform designed to meet the needs of large enterprises. It combines various
Jan
27
2025
Ensuring Optimal Active Directory Health, Security, Performance, and Upgrades
Active Directory Domain Service (AD DS) is widely used directory service and foundation of Windows domain network in organizations. It

Jan
20
2025
Transform Your Business with Power Automate, Power Apps, and Copilot Studio
Microsoft’s Power Platform is a robust suite of tools designed to empower businesses to innovate and transform their operations. It

Jan
09
2025
How to Manually Migrate a WordPress Website from One Host to Another
Migrating a WordPress website from one host to another can seem daunting, but with a step-by-step guide, the process becomes

Dec
18
2024
A Stress-Free Guide to Setting Up Your Azure Environment
It’s like going on an adventure when you start your cloud journey. It may make you happy, but if you’re

Dec
18
2024
Microsoft Fabric Uncovered Capabilities Advantages
In this blog we will dive into Microsoft Fabric and go over the core services offered on the Fabric platform.

Nov
18
2024
MS Fabric and the Future of Predictive Analytics: What to Expect
Uncover how MS Fabric is transforming predictive analytics and what innovations lie ahead for businesses and technology.

Nov
12
2024
Unlock the Power of AI with Microsoft Copilot Studio
In this webinar, we dive deep into Microsoft’s transformative AI technology and show you how to create custom AI assistants
Nov
07
2024
Power BI for Business Success: Making Data-Driven Decisions Easy
Learn how to make the most of Power BI’s sharing functionalities to drive impactful data-driven decisions.

Nov
07
2024
Setting up High Availability and Disaster Recovery for Enterprise Applications
Learn how to ensure business continuity, minimize downtime, and protect your critical systems with best practices for HA and DR.

Nov
07
2024
Analytics Unplugged: From Raw Data to Actionable Insights
Dive into the world of Data Analytics and discover how to harness the power of data for smarter decisions and

Nov
07
2024
Overcoming Cloud Migration Challenges
Cloud migration offers numerous benefits, but it also comes with its own fair share of challenges Delve into the most
Oct
18
2024
Rescuing Important Emails from the Junk Folder with Microsoft Graph API
Introduction: Because, Of Course, It Had to Be the CEO Let me paint you a picture: we were managing the

Oct
07
2024
Cloud Adoption Challenges
Tune in for a deep dive into overcoming hurdles in cloud adoption using real-world solutions from our co-founder, Vineet Arora.

Sept
17
2024
Power BI Consulting Company
Power BI Consulting Company: Empowering Businesses with Data-Driven Insights In today’s competitive landscape, organizations need actionable insights to stay ahead.

Sept
17
2024
Power BI Partners
Power BI Partners: Driving Data-Driven Solutions As a trusted Power BI partner, Mismo Systems is dedicated to empowering organizations with

Sept
17
2024
Power BI Development Company
Empowering Data-Driven Insights in India (Delhi, Noida, Bangalore) and USA In today’s digital landscape, businesses are generating vast amounts of

Sept
17
2024
Power Bi Development Services
Power BI Development Services: Unlocking Data-Driven Success At Mismo Systems, we offer specialized Power BI development services to help organizations

Sept
10
2024
Power BI Service for Enterprise Analytics
In today’s data-driven business landscape, enterprise analytics plays a crucial role in informed decision-making and maintaining a competitive edge. Microsoft’s

Sept
10
2024
Planning Your Legacy Application Migration to Containers
This blog post is in continuation to “Why Migrate Legacy Applications to Containers and What are the Challenges this Brings?”

Aug
05
2024
Azure AI, ML Studio & OpenAI: Simplifying Microsoft’s AI Ecosystem
In today’s rapidly evolving technological landscape, integrating artificial intelligence (AI) and machine learning (ML) into business operations is no longer

Aug
05
2024
Why Migrate Legacy Applications to Containers and What are the Challenges this Brings?
Introduction to Containerization Containerization is the era to welcome: a time where complexity would confront simplicity in the field of

Apr
18
2024
Azure Log Analytics Workspace – Ensuring Compliance, Centralizing and Streamlining Monitoring
In the realm of cloud computing, the ability to monitor, analyze, and respond to IT environment anomalies is crucial for

Apr
17
2024
Azure Stack HCI 3-node Cluster Configuration – Switchless Storage Network
Mismo Systems implemented a 3-node Azure Stack HCI cluster for one of the clients. The cluster was configured with a

Oct
04
2023
Microsoft update: Chat with users with Teams personal accounts
Chat with Teams will extend collaboration support by enabling Teams users to chat with team members outside their work network

Dec
01
2022
AWS vs Azure
The cloud service providers AWS and Azure are truly miraculous helping millions across the globe creating a virtual space with

Apr
25
2022
The need for a hybrid solution – Azure Stack HCI
Microsoft’s Azure Stack HCI is a hyper-converged infrastructure with virtualization, software-defined networking, and more. What separates it from the rest

Jan
10
2022
Azure Virtual Desktop vs Windows 365
Azure Virtual Desktop (AVD) is a Desktop as a Service (DaaS) solution offered on Microsoft Azure, previously named Windows Virtual

Nov
16
2021
AWS Update:- Amazon EC2 now supports access to Red Hat Knowledgebase
Starting today, customers running subscriptions included Red Hat Enterprise Linux on Amazon EC2 can seamlessly access Red Hat Knowledgebase at

Nov
16
2021
AWS Update:- Amazon SNS now supports token-based authentication for APNs mobile push notifications
For sending mobile push notifications to Apple devices, Amazon Simple Notification Service (Amazon SNS) now enables token-based authentication. You may

Nov
16
2021
AWS Update:- Amazon ECS now adds container instance health information
Customers may now see the health of their compute infrastructure using Amazon Elastic Container Service (Amazon ECS). The customers running their

Nov
16
2021
Microsoft 365 Update:- Viva Connections is now generally available!
Viva Connections, part of Microsoft Viva, is your entry point to a modern employee experience. You get an all-in-one experience with the customized

Nov
16
2021
Microsoft 365 Update:- Meeting Activities in Teams Audit Log
Meeting Activities have been added to the Microsoft Teams audit log to help organizations respond more effectively to security events, forensic investigations,

Nov
15
2021
Azure Update:- Global Disaster Recovery via Azure Site Recovery
Azure Site Recovery is a Cloud-driven, highly innovative, and automated disaster recovery solution (DRaaS). Azure’s native platform capabilities for high

Nov
15
2021
Azure Update:- Screen Capture Protection for Azure Virtual Desktop
Azure Virtual Desktop is a service running in the cloud that enables your users to access the data, applications, and

Nov
15
2021
Azure Update:- Immutable Storage with versioning for Blob storage
Azure blob storage is massively scalable and secure object storage for cloud-native workloads, archives, data lakes, high-performance computing and machine
Nov
10
2021
How is Cloud transforming Industries?
Cloud technology has been impactful in transforming business. From cost savings to easy collaboration, the usage of the Cloud has

Sept
27
2021
4 Tips for Protection Against Unsafe Emails
Earlier, the spotting of malicious content in emails was quite an easy task. However, due to the rise in technology,

Sept
24
2021
How is hybrid cloud useful for midsize/large businesses?
A hybrid cloud can be defined as a cloud computing environment that utilizes a combination of on-premises private cloud and

Sept
22
2021
How to Protect Your Data from a Ransomware Attack
What is a Ransomware attack? It can be defined as a malware attack that is carried out deliberately to encrypt

Aug
24
2021
Build superpower apps, with no code-Power apps
PowerApps is a tool that allows you to create custom apps, leveraging many of the features of the Office 365

Aug
11
2021
Why do you need a Modern Workplace – M365?
Microsoft 365, a world of enhanced productivity and collaboration that drives a team to achieve more together, is a complete
July
02
2021
Microsoft Teams Updates (June 2021)
In this blog, we will be discussing the various Microsoft Teams updates in the month of June. Meeting Updates: During

June
22
2021
Microsoft rebrands Windows Virtual Desktop as Azure Virtual Desktop
Microsoft’s virtual desktop infrastructure platform has been rebranded under the Azure name and notified of new security and management capabilities

May
07
2021
How Startups can succeed with Cloud Computing?
Startups are an enjoyable but demanding professional experience. A host of entrepreneurially dedicated professionals pursue their passion and dive into

May
04
2021
Azure AD SSO & AWS – Connecting the Rivals
Being part of Mismo Systems, I am fortunate enough to get to work on a diverse set of projects. Few
May
04
2021
A quick look at the 4 Most Used Services on Microsoft Azure
1. Azure Compute Azure compute is an on-demand computing service for running cloud-based applications. Azure compute service can be divided broadly into three

May
01
2021
Cloud Security – A shared responsibility
We see all businesses small or big, consuming cloud technology in one or another way. The pandemic has increased the
Apr
18
2021
Breakout Rooms and Its Usage – Microsoft Teams
In this blog, we are going to discuss a feature provided by Microsoft teams known as Breakout rooms. Also, we
Apr
12
2021
Is Cloud cheaper than On-premises Data Centres?
Cloud has bloomed over the last decade, according to Goldman’s analysts almost 23% of IT workloads now live on Public
Apr
04
2021
Amazon CloudFront
Amazon CloudFront is a brisk Content Delivery Network (CDN) service that safely transfers data, videos, applications, and Application Programming Interface
Apr
04
2021
Hosting with Transparency, Compliance, and Security
We help customers host applications on the cloud, this includes accounting systems including Tally, ERP software including SAP, and Navision.

Apr
04
2021
Future of Cloud Computing
Cloud computing has established itself as the inevitable future when it comes to IT services. This picture becomes much clearer
Apr
04
2021
AWS Security Features
The Amazon Web Services (AWS) in terms of security follow a shared responsibility model. So, the security ‘of’ the cloud is on
Mar
14
2021
Azure vs AWS
It’s Azure vs AWS!! Read this blog to know the major differences between Azure & AWS. What is Azure? Microsoft
Mar
04
2021
Amazon FSx – How can it help you?
The Amazon FSx has a very efficient way of deploying and running traditional file servers in the cloud that is
Mar
04
2021
What is Budget in Azure and how can you set the Budget?
Budget in Azure to manage and monitor the spending or consumed cost for Azure services. We can apply budget on
Feb
23
2021
DevOps with AWS
What is CI CD? Continuous Integration Developers work on the code which is stored in a code repository. Code repository

Feb
09
2021
Azure Firewall
Azure Firewall is a managed, cloud-based network security service that protects your Azure virtual network resources. You can centrally create,
Feb
04
2021
AWS Directory Service: The Amazon Cloud Active Directory!
The AWS Directory Service provides several ways to use the Microsoft Active Directory (AD) with other AWS utilities. Information regarding
Feb
03
2021
Package Manager for Microsoft Intune Administrators – Part 1
Deploying applications to end-user Windows machines has never been easier if you are a Microsoft Intune administrator. Earlier what used
Feb
02
2021
Major Cloud Concerns – Do corporate agents, cyber hackers, and governments have access to my data if it is in the cloud?
This is one of the major cloud concerns for many companies, but it is irrational. Your IT team manages access,
Jan
04
2021
How Global admin can give someone’s OneDrive access to another user?
Please follow the below steps to use this feature. Go to Admin Center https://admin.microsoft.com/ > User>Active Users> Search Name>Click on User Profile.

Dec
04
2020
Microsoft Secure Score
Microsoft Secure Score is a security analytics tool that provides better security configuration and security features. It applies a numerical

Dec
04
2020
Top 10 Elements of The Cloud
In this blog I will be talking about the Top 10 elements of Cloud. Virtual Network: Create a logically isolated section
Nov
04
2020
AWS CodePipeline
AWS CodePipeline is an Amazon Web Services tool that automates the app deployment process, enabling the developer to easily create,
Nov
03
2020
How Cloud Computing Can Improve Your Business?
Cloud computing provides users with access to files, applications, data, and services from their Internet-connected devices, such as smartphones, laptops,
Sept
04
2020
Visio Tabs in Microsoft Teams
Visio Tabs in Microsoft Teams allows team members in a dedicated space to access resources and information in a channel
Aug
04
2020
Cloud or On-prem? – All you need to know about moving to Office 365
Protection and uptime are usual for Office 365 in the cloud. Companies are generating data at an utterly impressive pace

Feb
09
2019
Remove Azure AAD Connect
Let’s see the steps to disable AD Sync, remove AAD connect and move to cloud-only administration. 1. Download Azure Active
No Comments